Showing posts with label quilting. Show all posts

Monday, August 15, 2022

 Well life continues to throw “surprises” at you.   “What doesn’t kill me makes me stronger.”

I just recently had outpatient surgery so I’m restricted with my mobility for the next couple of days.  Before I went into surgery, I prepared a “sew-care” package.  My Sew-Care package contains some hand sewing that I am working on.  

During covid I started working on a design I found in American Patchwork and Quilting Magazine, Issue 164. The pattern is called Lunch Circle.  


The quilt in the magazine has about 6 rounds.  I’ve decided to go for 10 rounds.  Instead of making this a table mat, I’m going to turn it into a centerpiece for a quilt.  I’m almost there I’ve got 8 rounds done.  


I also included a little thread/needed holder.  I found a handmade thread/needle holder at an antique mall and decided to reverse engineer it to make one for my self (I hate I didn’t take pictures of it before I took it apart).  I made a paper pattern for it.

Here’s a photo of the external of the holder.  It resembles a cloth-version of a lipstick holder.  I get farther along, I’ll post photos of the internals when I get farther along with it.


Well off to my recovery sewing!


Happy Sewing ……….

Sunday, August 7, 2022

T-shirt quilt for a friend…

So a dear friend of mine was telling me how she had all of the shirts from her sorority.  It’s been over 30 years since she pledged.  So I decided to make her a T-shirt quilt with some of them.  

Well I started on this last year, and “life” got in the way.  But I finally got it done!  Tomorrow it gets shipped out tot he east coast.  


I found a African wax print that went perfect with the pink and green colors.  The blocks on either end of the center t-shirt were made with the logo from several polo shirts: 


I decided I needed to put some type of label on it.  At first I thought I’d embroider a label on my embroidery machine.  But that was going to take to long.  So I decided to print one on my computer.  I purchased some photo fabric from a local store.  


I used Microsoft Word to generate the label and printed it on my printer.  I even soaked it in water to ensure that it was permanent.  And it was!!!!  I left a 1/2” border around it, which I tucked under and hand stitched in place


I’m hoping she likes it.  

Happy Sewing !!!!


Thursday, June 24, 2021

Surgery recovery can be dangerous to your pocket-book!

 So I had my a2 weeks ago.  I'm glad to say that I know longer have the intense pain in my leg; however, I'm still having severe nerve pain periodically, and have a tendency to loose my balance.  The doctor the next couple of weeks will be up and down; I'll have good days and bad days.  Currently when I move I have to move "like a log"; i.e. no Bending, Lifting (anything over 5 lbs), or Twisting!  I've had moments when the pain hits, that I just want to cry, but everything will heal in God's time; not mine!

So as I continue to be incapacitated.  I've been continuing to become acquainted with my sewing/quilting software.

I'm continuing to advance my skills with EQ8 (Electric Quilt 8).  My latest thing has been designing hexagon blocks and quilts.  I discovered a "log cabin hexagon" block which I fell in love with, and a pineapple hex:

Hexagon squares


One of the quilt layouts I've done is using the Log Cabin Hex: 


I haven't decided if I'll leave it shaped as is, or make the sides more straight.

Since I did so many quilts during the Covid break (over 20 quilt tops), my husband told me I should invest in a Long Arm.  I'm not quite ready to take the plunge yet; as I am still investigating the different manufacturers and features.

So I've been looking at alternatives to sending my quilts out (The cost would come to over $4K if I sent all of them out).  I just realized I can do the quilting on my machine using my embroidery machine.  I'm trying to decide if I want to invest about $300 in a quilting addition to my current embroidery software, possibly Floriani Designer Quilt II or Perfect Embroidery Pro's My Quilt Planning.

I've been thinking now might be the time to get comfortable with free motion quilting; but large quilts are hard to manage on a domestic machine.  

I sat in on a virtual seminar yesterday with Pins and Needles, Cleveland Ohio, and DIME is offering "Weightless Quilter Frame", that is supposed to help with quilting of large quilts.

Photo from Sewing Machines Plus


This costs $299 on sale.  I was reading thru some blogs/forums, I found this in the Missouri Quilt Forum: 
Image from Missouri Quilt Forum (Alternate Setup)

Pet Grooming Arm and Harness (from Missouri Quilt forum)

Jumbo Clamp (image from Missouri Quilt forum)


This setup is a log cheaper (only $80 total) and is portable.  I can take it down when I want to use my sewing table for garment sewing.  I have a koala Treasure Chest cabinet wtih add-on shelving that is waist high and is solid and sturdy; so I won't have any problem clipping these onto my table.

Since I've had the back injury, I've been looking for ways to minimize possible injury to my back.  Since I'm working with large quilts, and want to make use of what I have for the most part, I just discovered using "pool foam noodles" to create my quilt sandwiches.  I found out about this at: 

https://www.youtube.com/watch?v=pzx4dQqfkO4

I just bought some of the jumbo pool noodles and they are expected to arrive end of July; hopefully I'll be recovered enough by then that I can try everything out.


Happy Sewing Everyone!

Wednesday, December 30, 2020

Continuing my 2020 survival sewing . . . A Quilt Along (QAL)

I've been continuing to do my survival sewing. I was hoping my survival sewing would end with 2020; but looks like this will continue into 2021. So I'm calling this my 2020/21 Survival Sewing. I'm hoping to get back into garment sewing; but that may be a while. My company is officially switching us to a remote working environment. This is going to go on at least thru the first quarter of 2021. So I'll continue to sew to keep my sanity! 

I've been quarantingint to the max!  I've also continued to work on my quilt tops. The latest was a quilt along sponsored by Janome, Maywood fabrics, and "Love of Quilting" magazine.
Quilt photo from Quilting Daily

The quilt is a 6 part series.  The entire quilt instructions can be found at Warmth of our Stars.
It is available in its entirety till Jan  7th (along with videos).  After that it can be found monthly thru 2021 in "Love of Sewing" magazine.

Of course, being that I get impatient when it comes to finishing quilts.  I've downloaded the instructions, and completed my quilt top last week (just need to add border).

Center Star with Flying Geese

It's starting to come together

The total top, completed just need to add border.

This is the first time I've made a pieced a quilt using flannel.  I did a rag quilt a couple of years ago, which is totally different from from doing piecing with flannel.  I'm not sure if I'm a big fan of using flannel for piecing; but may give it another try later.

Some of the take aways I got from this: 
  1. Pre-wash the flannel.  I wasn't sure of how much shrinkage would occur, so I prewashed it.  I'm glad I did.
  2. Press your seams open.  Using flannel the fabric is bulkier, so pressing the seam allowances to one side creates too much bulk.
  3. Definitely PRESS AS YOU GO!!!  Makes like so much easier.
On to the next quilt top.....

Happy Sewing Everyone!

Friday, November 13, 2020

2020 Survival Sewing: Log Cabin Block

 One day I'll get back to my garment sewing; when Covid has subsided and I can go places.  So for now I continue my sewing with my quilting.

My next design uses the log cabin block.  


As usual I scanned in my fabrics and played with quilt layout using Electric Quilt 8.  

After some playing I came up with the final layout: 

Line Drawing of the final quilt layout.


I chose to set the blocks on the diagonal. Once I had my fabrics scanned in, the final quilt design turned out to look like this: 

My original design used 3 borders of 1" in width.  I decided to switch to single border 2" wide.
Here's a preview of the design in Electic Quilt 8

Now for the final completed quilt (Sorry for the lighting, had to do my photo's inside due to the cold weather): 

The FINAL QUILT!!!!

I love me some Electric Quilt!  Before I would have done this using paper and color pencils!  
Talk about saving tress!!!

Now onto my next quilt.  I'll be making the infamous John Lewis quilt seen in this photo.  

Photo from Reddit.com


I've already drafted my pattern in Electric Quilt.  I figure this would be great for using scraps.

On to the next quitl.

Happy Sewing!!!

Friday, November 6, 2020

Quilting Part 3 (2020 Survival Sewing).

So I have decided to call these quilts my "2020 Survival Quilts" .  I don't know about everyone else, but everything that has gone on this year is taking its toll on me mentally.

So sewing has become my therapy.  I've been averaging a quilt top every 2 weeks or so.  Ive been doing this since about September timeframe.

I call this part 3 but this is actually my 6th quilt top.  The first 3 were lap quilts.  But for some reason I just don't feel like that size is very usable for me.   I tend to do quilts that are queen/full size. These latest quilts are 80 inches in size or larger.  I like for my quilts to be "used" by the people that received them.  I learned that I am a "UTILITY" quilter; meaning that I like for my quilts to be "utilitized".  (Don't you love the sound of that đŸ˜€).

My husband asked me what were we going to do with all of these quilts.  I told him I haven't thought that far yet!  However, I do think I've just about got him convinced that he needs to invest in a Long Arm quilting machine for me.  My husband even mentioned that it could be an investment towards retirement.  Plus with as many quilts I'm making, its cost well over the monthly note for a long arm quilting machine.

Now onto quilt #3: 

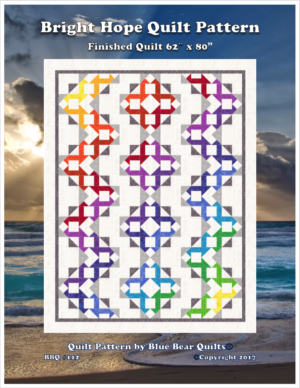
I saw this pattern on a stroll thru instagram, and fell in love with the pattern.  It's called "Bright Hope" from Blue Bear Quilts": 

Image from www.bluebearquilts.com

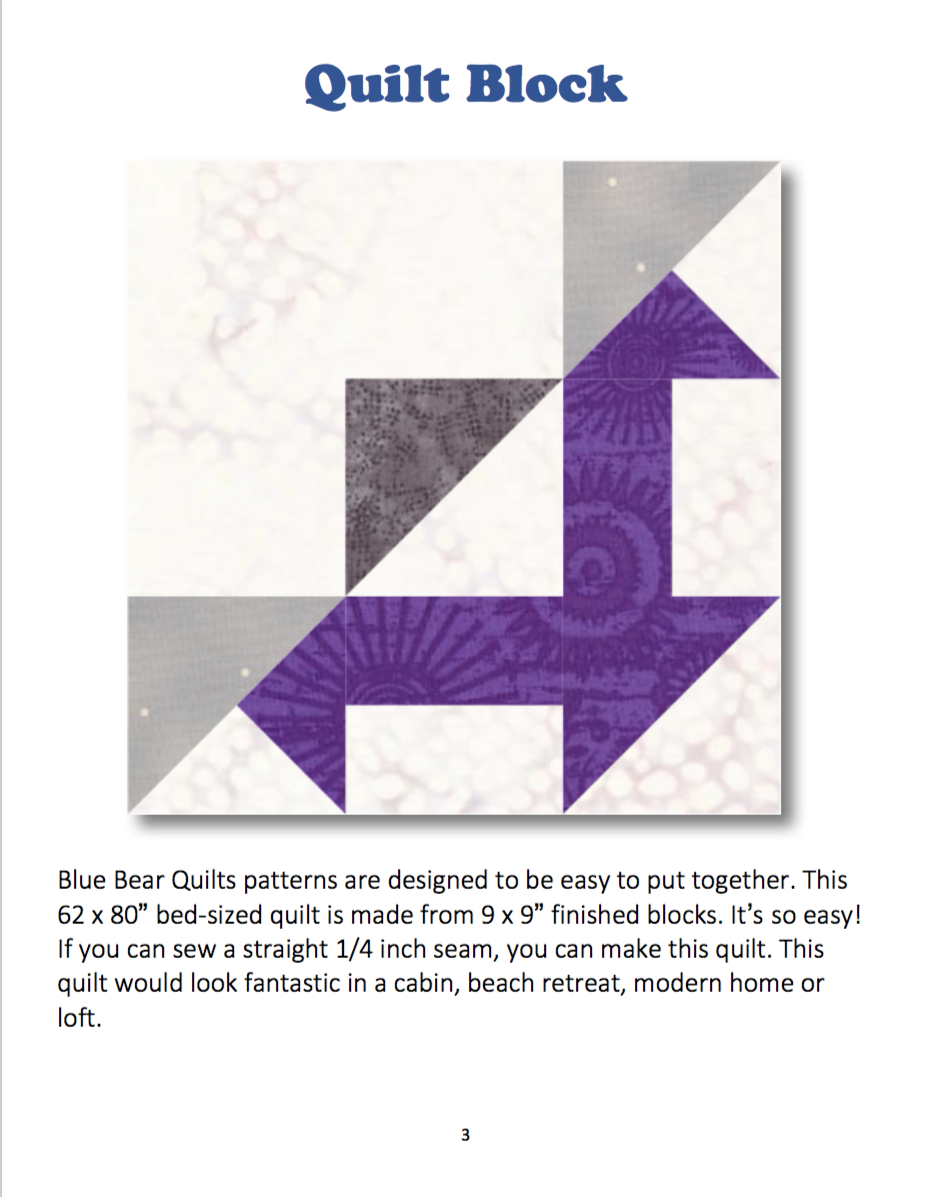
Althought the quilt design looks very involved is based on one block.
Image from www.bluebearquilts.com

I did some "reverse engineering" (The engineer in me creeps out every once in a while). I entered the design into Electic Quilt 8 (Quilt design software). Then I added images of my fabric and was able to get a preview of what the finished quilt would look like. This is my variation of the design from my Electric Quilt software..


During my 2020 survival journey I've had a couple of goals in mind: 

  1. Learn to use my Electric Quilt 8 software
  2. Use my Accuquilt cutter to cut out my design as much as possible (I own all of the qube sets, so I can create just about any block design.
  3. Use as many of my exsting fabric stash as possible.
I used my Accuquilt quilt dies to cut out the block pieces.  This reduced my cutting time tremendously!


If you want something that looks complicated, but is simple to put together definitly visit Blue Bear Patterns and give this pattern a go.  They have some really interesting quilt designs.

This quilt along with the previous one, will be going to the quilter by next week.

Maybe by Christmas I'll get that long arm quilting machine đŸ˜‰

Happy Sewing Everyone!


Thursday, October 15, 2020

Quilting part 2

 So here is my 2nd quilt completed during these pandemic/unrest times.  My sewing is what is keeping me sane.  Its become my therapy!

This is my second quilt in this journey of learning my Electric Quilt software.  This time I set the blocks on the diagonal, in an attempt to reduce the amount of bias edges.

Quilt Design in Electric Quilt

I love the fact that I can scan in images of my fabric to get a somewhat true vision of the final quilt.

Here is the actual completed quilt.  It measures 86x86, and will go off to the quilter on Monday with 2 other quilts.

Photo of completed quilt

This quilt was done using sttip peicing and making half-square triangles and quarter-square triangles. I am so excited that the quilt looks like the EQ image.

Photo of completed quilt taken outside 

I've already started the third one.  I designed it in Electric Quilt and will be using my Accuquilt dies to do the actual cutting. At the rate I'm going it should be completed in about 2 weeks.

If I keep paying a quilter to do the quilting, I may as well look into buying a longarm machine.  I figure by the time I pay the 10th quilt to be quilted, my husband will be agreeable to it. 

So 3 down, 7 more to go! đŸ˜‰


Happy Sewing!

Sunday, September 27, 2020

Quilting

 So I've been taking a break from garment sewing for a while.  The more garments I made with no place to go just got me even more depressed during this time of Covid.  So I've switched to making quilts for a while.

So much has been going on lately that it is taking major effort to maintain my sanity.  

When it is quiting time, I shut it down completely!  No running back to the computer.  It was stressing me out way too much.

I've learned little things like I need the "decompression" time that I used to have driving home from work.  So now when I shut down work, I automatically sew for at least an hour.

Lately I've been focusing on my quilting.  I'm working on becoming more proficient with my Electric Quilt (EQ8) software.

Here is my most recent EQ8 quilt design: 

My Design from Electric Quilt 8 

I was actually able to import pictures of my fabric so that I could see the actual design in the fabrics I've chosen. I used fabric from Blanks Quilting Company (Dotsy in Black adn White) used for stripes.  The background fabric is Wilmington Fabric (Essentials in Dark Asphalt).  The "Dotsy" fabric was in my stash, and of course I was short of fabric for each.  But luckily, ,I was able to locate it via online from a little shop called the Hideaway Quilt Shop in Missouri.  My background fabric was purchased at my local quilt shop, A Quilter's Corner in Eric, CO.  ( I love this shop!  The owner is amazing. And they are open on Sunday for a few hours, for those times when I'm in desperate need for something).  I always try to shop my local fabric shops first!.

Picture of photo for lighting

Full Quilt

The final quilt is 98" x 98" in size.  I left off the corner triangles; I think it give it additional character.  

I'm hoping to get it off to the quilters next week with another quilt top that I am finishing off.


Happy Sewing. . .

Saturday, August 24, 2019

Sewing is my refuge: Completed 8 point star!

Well its done!  The 8 point star is complete!

Turns out I only had enough to complete 7 of the 8 stars.  No problem, right?
I thought about turning it keep it 8 points (by adding fabric to the diamonds); that was going to be too much math and work to implement.

For example 8 stars are each 45 degrees each, so with 7 points I’d need to make each point 51.4 degree’s at the center of the quilt.  Way to much work to add fabric around each diamond to make them a fraction of a degree at the center.  This is supposed to be my refuge; not my 2nd job.

So I found a solid yellow (again at the thrift store), and decided to alternate the pieced diamond with solid yellow diamonds.

The finished quilt will be ~83x83.  I’m going to use 2 of the pieced diamonds to make pillow shames.

I found the yellow from the thrift store also for $1!  And I have a solid white for the background, and floral soft blue print for the quilt border.  All of the fabrics came from the thrift store!  Maybe I should call this the “thrifty quilt”.

All total the quilt and shams come to a total of $36.50.  Not bad!

I was happy I was able to match up the center points pretty well. So I’m very pleased.


Now on to put the final touches on it, so I can quilt it.

Happy Sewing!

Tuesday, August 13, 2019

Sewing is my refuge, part 3

I’m getting closer to completion on my vintage sewing kit.

I’ve got 5 of the total 8 star points done:
5 star points and growing!
Well as I get closer to completion, looks like the fabric for the 8th star point is missing (this is probably the one that the original owner attempted).  This is not unusual, as anyone that has purchased vintage patterns knows sometimes a piece can be missing. I’m up to the challenge!

I have this saying whenever I work on something “The only perfect person was Jesus, and look what they did to him!”.  So in my imperfection, I am perfect!  This helps me with my desire to be perfect in everything I do (I know there are others that deal with this).  So my quilt won’t be a “perfect” implementation of the original Lone Star quilt pattern, but it will be perfect for me.

I’ve been contemplating how to resolve this, and have a couple of design options.  This is another case where my engineering skills may have a “real important” practical use in everyday life - đŸ˜‰

I’ll let you know how it goes!

Happy Sewing.....

Wednesday, January 9, 2019

My Very Own African King!

Like every seamstress, I do all types of sewing; garment, smocking, heirloom sewing, quilting, etc.

I can't really tell you which is my favorite, I tend to cycle thru them.

I belong to a quilt guild here in Denver.  I have been working on a quilt design for our 25th anniversary.  We decided to go with the African Queen quilt block.  Each member will make a version of the block which will be used in Guild Quilt.  This block is pretty easy to find on the internet, and very easy to draft.. (Sample layouts of African Queen).


Since we have some male members, we needed a African King pattern. I couldn't find a variation of a African King pattern. So I set up on the task of creating my own African King pattern.
I use the Electric Quilt 8 software to generate my African King.


Both blocks were drafted on a 3x3 grid.  For example for the head of both designs is a 3" square. 
The body is a 6" square:


The Electric Quilt software made it very easy to draft both designs.  Here's a sample of the line drawing for the African Queen:


The nice thing about EQ (Electric Quilt) is that I can easily print out the pattern for the design in a  pieced, applique, or rotaty cutting format.  I can also resize with no-effort. My current design is for a 9" finished size square block. 

Creating a quilt layout using the blocks is very easy in EQ.  Two of the layouts that I've played with are below:


EQ also provides me with yardages for the quilt design along with the final quilt measurements.  The layout above results in a 80"x80" quilt.  (YEA! I didn't have to pull out the paper, pencil and calculator).

EQ made the whole block design and layout simple. I can still play with it, as I figure out a layout design that will work based on the number of completed blocks I get back.

We're expecting to have the project done by May of this year.  I'll take pix and post here.

Happy Sewing everyone!

Tuesday, October 4, 2016

The T-Shirt Quilt, amongst other things

Yes I'm still here!

This past couple of months have been stressful and challenging.

I just recently started a new job at a new company.  So I'm going thru the normal transition period. My former employer is going thru a lot of churn/change.  It's still hanging in there; but folks are leaving fast.  It is currently up for sale.

As for me, my stress levels went down tremendously!  I can even focus on my sewing again.

Also, my last one has left the nest!  She is out in the big blue world, on her own.  Praise God she got the hospital residency that she wanted (BTW, she's a pharmacist), and loves her job and the environment.

My parents and my daughter at her graduation.

As I get adjusted to her not being here; I was cleaning out her room and getting rid of un-necessary clothing.  She had lots of t-shirts from her days on the Women's basketball team at University of Wyoming.  Voila!  Look out T-shirt quilt, here we come. Here's the finished quilt top.

The T-shirt Quilt
 My daughter wants me to turn it into a lap quilt; but I think this one is destined to be a wall hanging.  The girl is over 6 feet tall!  I'm not feeling a lap quilt.  Besides I just did a rag quilt for her that was a twin size!  My husband says she's just spoiled.

Since each logo was a different size; I just sort of filled in the gaps with diagonal strips till all of the
rows were the same size. Now I've just got the quilting left to do.  I've been trying to perfect my machine quilting technique on small potholders.  This will be my first piece of some size.

Now that I've gotten my life back, expect to hear more from me.

Happy Sewing . . . .


Saturday, December 26, 2015

Fabric Friday: AccuQuilt GO!


I hope you had a Merry Christmas!

Although I haven't done much posting, I have been sewing.

For the holidays, I went to Omaha, NE to visit my boys.  As we were driving down I-80, I saw the AccuQuilt sign.


Its the main headquarters! So I called the number from the Quilters Traveler Companion (Yes, I own one of those thick books!) And they offer tours! So you know what I did right.
I took the AccuQuilt Tour!  Even though it was rainy that day; I've never been known to let a little rain get in the way of me and something sewing related!

It was a quick tour of their Quilt Exhibit (which changes regularly) and the Design Center.  The folks there were beyond friendly.  I got an opportunity to meet the owner and CEO!  As I went on the tour, they allowed me to take pictures!


The theme for the current quilt exhibit is "Quilts of Valor" (Go to http://www.qovf.org for more information)  Behind sliding glass doors is a mini-exhibit hall!
Here are some of the quilts that were displayed in the mini-exhibit:

After that I was taken to the Design Center.  All I can say is, I fell in love with this part of the tour.
There were multiple sewing machines: Bernina, Janome, etc.  And of course there was the AccuQuilt machines.  Every machine that AccuQuilt makes was in the room and hundreds of cutting dies!


Needless to say this was my favorite room!

I got an opportunity to visit the warehouse, and in the main entrance you see samples of quilts made using the AccuQuilt dies.
I thoroughly enjoyed the short tour.  I of course came home with the AccuQuilt Go!. I love the design and portability of the machine. I'm familiar with AccuQuilt from my scrapbooking.  They have a machine called AccuCut that is used for paper scrapbooking.  I used the AccuCut machines at my Local Scrapbook store, prior to their closing.  When they closed, I purchased a Sizzix and Cricut Original to use at home.  I'm expanding these to use in my sewing.
Picture from AccuQuilt.com
And when I spotted the two dies for Sunbonnet Sue and Overall Sam, I had to get those.  These were my grandmother's most used quilting patterns. 

This will definitely be greatly used in my quilting; as I am currently working on quilts for my kids and to "spruce" up my house.

As we were making our trip back, I discovered a cute quilt shop in Ogallala, NE; which will now become a regular stop on our trips to Nebraska.I bought a couple of pieces of fabric, etc.  I'll post about that later.