Saturday, January 25, 2014

What to do when you’re not buying ready to wear?


So I’ve joined two challenges to make my clothing for a year.  The first one is almost at the end: “The Sew Your Own Wardrobe” challenge.  Its scheduled to end in March.  This was my starter, and I have to admit, I’ve stayed true to it.  My husband was surprised.  Even with trips to Los Angeles and New York, I have not given in to the desire. 

Because of this challenge I’ve even branched out and made my 1st dress shirt (yet to be posted).  Being tall as I am though it didn’t take a lot of restraint to not buy ready-to-wear. There just are not too many garments on the rack that fit a 6 foot tall woman.

Well when Goodbye Valentino, started another challenge, “NO Ready To Wear”, I jumped at the opportunity.

So since I am not buying clothing, what am I buying?  Well I can now focus on the accessories like jewelry and shoes.  And then there is always fabric and more fabric.

On my way home today, I decided to stop over to Colorado Fabrics in Denver.

This is one of my favorite fabric stores in the area for fashion fabrics.  I still do the big chain because they are closer to my home. 

So today I went to their bargain table and found these four pieces:

DSC_0589

I know what you are wondering what I am going to do with them.  The solid brown piece at the top, I will be using as a muslin for jeans.  I think its time to refit my pattern

The next sort of crackle piece is about 1.5 yards so I’m planning on some crop pants.  It’s a denim weight with just a little bit of lycra/spandex in it.

The strip piece is about 2 yards, I’m going to make a top to wear with jeans

The checkered piece is a nice knit weight with faux leather look. I was thinking of a nice peplum type top, something to wear with a nice pencil skirt.  I don’t know thought it might be too much

And then they have a “by the pound” bin that is $2/lb.  Both pieces were at least a yard in length, and knits  so they will be excellent for making tops.  I’m thinking something to work out in.

DSC_0592

Did I need more fabric?  Probably not; but its way better than therapy, and definitely a lot cheaper.

Happy Sewing . . . .

Friday, January 24, 2014

Vintage made Modern


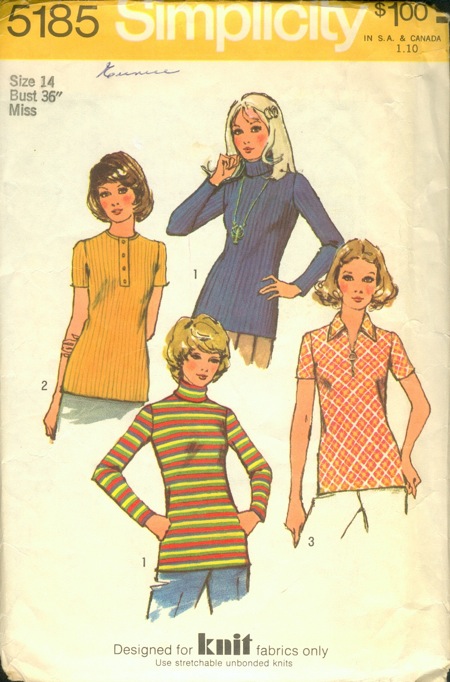
A while back I posted a turtle neck top that I had made from a vintage pattern (Just a little bit of leftover fabric . . ).  I lengthened the pattern into a dress and then tapered it in at the hemline by 2” on each side.


DSC_0582


Voila!  This is the resulting dress.  I love it, its not too tight and not to loose.  This is fabric that I purchased on the clearance rack in early 2013. ( I think it was at Denver Fabrics; now known as Colorado Fabrics).
I got this for 50% off, paid like $3/yard for it. I bought it to be a muslin as I tried to get the fit right for the top turned dress.  It fits beautifully, so its become a final dress.  I didn’t have to alter my dress pattern.


DSC_0583
Then I got lucky and found a knit at Colorado fabrics (formerly known as Denver fabrics).  I found this on the clearance rack for $1/yard.  I couldn’t believe my luck.  I figured it would work great as a lining, and boy was I right.
So guess what, I bought 20 yards of it!  I’ve got more than enough knit fabric for dresses so it will definite be used.  Having the knit lining does wonders for the fit of the dress.  It keeps it from being too clingy.
I didn’t bother to hem the underlining, I mean no one is going to see it right.  And this fabric doesn’t ravel.  So I just cut it about 4 inches shorter than the actual finished dress and serged the hem of the lining.


DSC_0586


Well when you get a good fit on a dress then you of course have to make it in another fabric right!  So off I went to my stash closet to get another piece of knit, and this is what I ended up with.
I consider it sort of a leopard print, maybe?
Again I lined this in the black knit that I used on the previous dress.
As you can tell I love my turtle necks to be to long in the neck part.  Maybe it’s because I’m tall and think I have a taller neck.  I just like it to “bunch” up a little.


What alterations did I make to the pattern you ask.
  1. I marked the hipline 9 inches below the waistline (This is where the widest part of my hips fall).  I used my the old “pivot slide” technique to do the initial side seams, then used a curved ruler to smooth out the curved seam from waist to hip (I have a Fairchild Designer kit which contains every possible ruler that I would need to alter patterns). I compensated for ease.  I sort of estimated the width based on the width for the pattern size that I used, and then adjusted out from there.
  2. From there I lengthened the dress so till it was just below my knee.  Then at the hem line, I tapered the dress in about 1” on each side seam (A total of 2” on each side).  This gave the dress a more fitted styling without being to tight to walk in.
I am so in love with the dress and how it looks on me, that I’m going for two more.  But this time I’m going to make them floor length.  One of them will be made from this fabric that I got a while back (I think it was mail order from Moods):
DSC_0588 Because of my height, I’ll be confiscating the kitchen counter top (it’s the only area long enough for me to lay out the knit fabric without it hanging off the sides).
I’m trying to decide if I will line it in the black or in a cream color knit that I have.
 I’ll post more details when I make this one with respect to the pattern modifications, etc.

I’m hoping to get photos of me in the dress. I’m still trying to feel comfortable using my camera remote.

I may give my husband another chance at picture taking; but he seems to be  “camera challenged”.  When he takes pictures for some reason he always leaves out appendages like the head, arms, legs etc. 
Well, off to my kitchen counter, oops! - “cutting table”,  I go.


Happy Sewing . . . .

Wednesday, January 1, 2014

Out with the Old – Sew Beautiful Magazines Back Issues

Since the beginning of December, I have been doing a major "clean-up/organization" of my sewing room.  It started with me purchasing book shelves from Ikea and going thru my book/magazine stash.

My sewing was starting to occupy 2 rooms, and I decided that wasn't necessarily a good thing!

I've discovered that I have duplicates of several magazines. I am posting these on the Sew Pattern Review classified.  But thought I’d post these on my blog in case you know of anyone that might be interested in purchasing them.  

Back when my daughter was younger I did a lot of smocking and heirloom sewing.  I’ll revisit it when my first grand-child comes along; but for now I’m in a holding pattern.  When going thru my sewing supplies I found back issues of Sew Beautiful, Creative Needle Magazine, and Australian Smocking and Embroidery Magazine (The last two magazines are no-longer in print).  If you would like to see which Issues I have you can refer to the Sewing Pattern Review Classifieds, or go to my flicker link. 

SB140-2012SB139-2011


    SAMPLE ISSUE COVERS


The first set that I am posting is for Sew Beautiful.  Please go to this link to see the back issues I have available.  You will see the magazine cover along with the table of content next to it.

Back issues of Sew Beautiful are $4.50 each plus shipping.  If you are interested in any please send me an email and we can work on shipping, etc. or take a look at my classifieds at Sew Pattern Review Classified.


Happy Sewing . . . .