Thursday, June 24, 2021

Surgery recovery can be dangerous to your pocket-book!

 So I had my a2 weeks ago.  I'm glad to say that I know longer have the intense pain in my leg; however, I'm still having severe nerve pain periodically, and have a tendency to loose my balance.  The doctor the next couple of weeks will be up and down; I'll have good days and bad days.  Currently when I move I have to move "like a log"; i.e. no Bending, Lifting (anything over 5 lbs), or Twisting!  I've had moments when the pain hits, that I just want to cry, but everything will heal in God's time; not mine!

So as I continue to be incapacitated.  I've been continuing to become acquainted with my sewing/quilting software.

I'm continuing to advance my skills with EQ8 (Electric Quilt 8).  My latest thing has been designing hexagon blocks and quilts.  I discovered a "log cabin hexagon" block which I fell in love with, and a pineapple hex:

Hexagon squares


One of the quilt layouts I've done is using the Log Cabin Hex: 


I haven't decided if I'll leave it shaped as is, or make the sides more straight.

Since I did so many quilts during the Covid break (over 20 quilt tops), my husband told me I should invest in a Long Arm.  I'm not quite ready to take the plunge yet; as I am still investigating the different manufacturers and features.

So I've been looking at alternatives to sending my quilts out (The cost would come to over $4K if I sent all of them out).  I just realized I can do the quilting on my machine using my embroidery machine.  I'm trying to decide if I want to invest about $300 in a quilting addition to my current embroidery software, possibly Floriani Designer Quilt II or Perfect Embroidery Pro's My Quilt Planning.

I've been thinking now might be the time to get comfortable with free motion quilting; but large quilts are hard to manage on a domestic machine.  

I sat in on a virtual seminar yesterday with Pins and Needles, Cleveland Ohio, and DIME is offering "Weightless Quilter Frame", that is supposed to help with quilting of large quilts.

Photo from Sewing Machines Plus


This costs $299 on sale.  I was reading thru some blogs/forums, I found this in the Missouri Quilt Forum: 
Image from Missouri Quilt Forum (Alternate Setup)

Pet Grooming Arm and Harness (from Missouri Quilt forum)

Jumbo Clamp (image from Missouri Quilt forum)


This setup is a log cheaper (only $80 total) and is portable.  I can take it down when I want to use my sewing table for garment sewing.  I have a koala Treasure Chest cabinet wtih add-on shelving that is waist high and is solid and sturdy; so I won't have any problem clipping these onto my table.

Since I've had the back injury, I've been looking for ways to minimize possible injury to my back.  Since I'm working with large quilts, and want to make use of what I have for the most part, I just discovered using "pool foam noodles" to create my quilt sandwiches.  I found out about this at: 

https://www.youtube.com/watch?v=pzx4dQqfkO4

I just bought some of the jumbo pool noodles and they are expected to arrive end of July; hopefully I'll be recovered enough by then that I can try everything out.


Happy Sewing Everyone!

Tuesday, June 15, 2021

Mapping EQ8 Block to Accuquilt Qube:

If you’ve read my blog then you know I had a fall on ice back in March, 2021.  Well I wound up  having surgery for a herniated disk.  So again, no sewing at all for me for a while.

When covid began, I decided to focus on learning to use my EQ8 software and Accuquilt.  For this post that I have decided to step thru a block and map it to Accuquilt (that’s one of things I’ve learned to focus on).

Everyone asks about the “Storm at Sea” done in Accuquilt qube (Note: Accuquilt has a BOB (block on board) for the Storm a Sea also).

The “Storm at Sea” can be found in EQ8 (standard and part of the Block-Base).  I used the BaseBlock pattern (2187).  This block size is 8”.  But if you map the block in one size it is very easy to create it in another size using the qubes.

So, let’s begin, the block looks as follows: 


1.      This is an 8” block.  Let us break this down to 2” units.  I’ve done this for you already by drawing a 2” grid.


1.      If you look you will see this has a set of grids that are repeated 4 times to create the actual block


.N  Now let us go to the EQ8 Rotary cutting instructions for the block. NOTE: I’ve added the cutting lines to separate the quadrants of the block).

1.  Looking at the quadraLooking at the quadrant, we will need shapes A, B, C, D, E, F, G.

1.      Now let’s look at the rotary cutting directions for each of these blocks: 

Shape A is a 1” half square triangle (cut 1 7/8” sides); Qube shape #5


Shape B
and shape C are mirrors of each other, and are equivalent to Qube shape 14.  Shape G is a triangle in the middle of a square.  Combined this square with shape B and shape C you have the “triangle in square” shape in the qube set; Qube shapes 14 and 13


Shape D is a 2” half square triangle (cut 1 7/8’ sides); Qube shape 3


Shape E is a finished 1” square (cut 1 ½” square); Qube shape 2.


The corner squares are a combination of shape A & F, and the corner block is a square in a square. And is made of Qube shapes 5 and 6.

In summary the shapes needed from a single qube set are: 2, 3, 5, 6, 13, and 14; which requires you to have the "mix n match" set along wi hthe accompanied "angle" set. 

Also with the rotary output you have a listing of how many of each size to cut in each shape and color.  For example shape 5 (equivalent to shape A) will be 16 cuts in purple and 8 in white.  Since B and C are mirrors of each other, you would cut 8 of shape 14 in one direction and 8 of shape 8 in the other direction.  With different qube sizes you can make different block sizes, just be sure to use the shape numbers specifie above:  

4” qube set => 8” square

6” qube set => 12” square

8” qube set => 16” square

10” qube set => 20” square

12” qube set => 24” squae

NOTE: If you use one of the larger sizes then you could easily replace the corner square with a more elaborate block. 

Also, these documents will come in handy when determining if a design can be mapped to Qube shapes:

Product Catalog => Download a Catalog (accuquilt.com)

Cutting Equivalent Chart =>GO_Cutting_Equivalents_Chart-QQJ31.pdf (accuquilt.com)


Happy Sewing Everyone!!!!


Sunday, April 25, 2021

Survival Update

I hope all has been going well with everyone out there.  

My sewing got interrupted because of COVID.  I came down with it the last part of January!  I was blessed to have a mild case.  I call myself being cautious and evidently it creeped in on me.  To be honest the fear of what could happen probably freaked me out worst than having it.  

The only symptom I had was "pink-eye".  No cough, no congestion, nothing else.  Evidently a small percentage of those with covid develop pink eye.  But I thank God I had very mild symptoms.

Needless to say I just completed my vaccine shot on last week.  So I am fully vaccinated!  YIPPEE!!!!

Once I got thru COVID, I started back to walking everyday for 2 hours.  Well, I live in Colorado, and we had a major snow storm in March.  As I was walking a couple days later, I stepped on black ice and fell. 


 First the doctor thought I had just a severe hip sprain, but turns out I actually slipped a disk!!!

What's that saying if it weren't for bad luck, I'd have NO LUCK AT ALL.  At least that's how it feels right now.  So I have very limited mobility for the last month and am working mainly from my bed, since even a couple of steps causes extreme pain in my leg (Can you say sciatica?).  I'm under a doctor's care and hoping to make a recovery soon.

These event's had me thinking of two things my dad always says:

  1. Getting old is not for Whimps!
  2. If you fall don't try to break the fall, you'll cause more harm to yourself trying to stop the fall!  It's best to just fall.
It's amazing that when you are young you think your parents are talking crazy, or that what they say doesn't apply to you.  Then one day you discover that your are getting old, and there is so much wisdom in the things they say.

So in the meantime, I can't sew 😢.  So I've been thinking and reading about sewing.  I've been reading some articles on fit and quilting techniques.  I've also been doing some quilt designs in EQ8 for future use.  I've been trying some contemporary quilt designs: 

Interlocked V's


Crossing Ribbons

I saw this design in a German American Patchwork and Quilting Magazine, and was immediately drawn to it: 


I was working on this before I injured myself.  Here is my diagram of the block:

Block Diagram (24" square)

My Test Block

Once I am mobile, this will be the first project I complete!

In the meantime, everyone stay safe and get vaccinated!

Happy Sewing.......

Wednesday, December 30, 2020

Continuing my 2020 survival sewing . . . A Quilt Along (QAL)

I've been continuing to do my survival sewing. I was hoping my survival sewing would end with 2020; but looks like this will continue into 2021. So I'm calling this my 2020/21 Survival Sewing. I'm hoping to get back into garment sewing; but that may be a while. My company is officially switching us to a remote working environment. This is going to go on at least thru the first quarter of 2021. So I'll continue to sew to keep my sanity! 

I've been quarantingint to the max!  I've also continued to work on my quilt tops. The latest was a quilt along sponsored by Janome, Maywood fabrics, and "Love of Quilting" magazine.
Quilt photo from Quilting Daily

The quilt is a 6 part series.  The entire quilt instructions can be found at Warmth of our Stars.
It is available in its entirety till Jan  7th (along with videos).  After that it can be found monthly thru 2021 in "Love of Sewing" magazine.

Of course, being that I get impatient when it comes to finishing quilts.  I've downloaded the instructions, and completed my quilt top last week (just need to add border).

Center Star with Flying Geese

It's starting to come together

The total top, completed just need to add border.

This is the first time I've made a pieced a quilt using flannel.  I did a rag quilt a couple of years ago, which is totally different from from doing piecing with flannel.  I'm not sure if I'm a big fan of using flannel for piecing; but may give it another try later.

Some of the take aways I got from this: 
  1. Pre-wash the flannel.  I wasn't sure of how much shrinkage would occur, so I prewashed it.  I'm glad I did.
  2. Press your seams open.  Using flannel the fabric is bulkier, so pressing the seam allowances to one side creates too much bulk.
  3. Definitely PRESS AS YOU GO!!!  Makes like so much easier.
On to the next quilt top.....

Happy Sewing Everyone!

Friday, November 13, 2020

2020 Survival Sewing: Log Cabin Block

 One day I'll get back to my garment sewing; when Covid has subsided and I can go places.  So for now I continue my sewing with my quilting.

My next design uses the log cabin block.  


As usual I scanned in my fabrics and played with quilt layout using Electric Quilt 8.  

After some playing I came up with the final layout: 

Line Drawing of the final quilt layout.


I chose to set the blocks on the diagonal. Once I had my fabrics scanned in, the final quilt design turned out to look like this: 

My original design used 3 borders of 1" in width.  I decided to switch to single border 2" wide.
Here's a preview of the design in Electic Quilt 8

Now for the final completed quilt (Sorry for the lighting, had to do my photo's inside due to the cold weather): 

The FINAL QUILT!!!!

I love me some Electric Quilt!  Before I would have done this using paper and color pencils!  
Talk about saving tress!!!

Now onto my next quilt.  I'll be making the infamous John Lewis quilt seen in this photo.  

Photo from Reddit.com


I've already drafted my pattern in Electric Quilt.  I figure this would be great for using scraps.

On to the next quitl.

Happy Sewing!!!

Sunday, November 8, 2020

2020 Survival Quilting (continued):

This is emotional and trying times for all of us.  So as I've said before my sewing has become my therapy.

Initially, I was making lots of clothing; but decided that wasn't going to work for me. When I make clothes I feel the need to wear them.  Well since I've been working from home since March, 2020; there really is no place for me to wear them.  I don't leave my house unless I have a need.  So having all of these garments with no pl
ace to wear them, was just making me more sullen.

So quilting to the rescue!  

I visit one of my local quilt shops almost every weekend.  The store is "A Quilter's Corner" located in Eric, CO.  They have some of the most amazing fabrics.

Well I fell in love with the M&S Textiles Australian Aboriginal fabrics.  They have some of the most beautiful colors and prints!


From A Quilter's Corner website

From A Quilter's Corner website


The prints are so vibrant!  I knew I needed to use them in a quilt.  My concern was that thy might be too busy.

So I decided to try to do something that would allow me to use the different prints.  Something like a scrap quilt, but I'd use the aboriginal prints instead.  Then I was inspired by the "Diamond Luau" pattern by Bluebear quilts.  It looked like the perfect way to use all of these prints.  I purchased 1/4 yd pieces of 25 of the prints.  I used a somewhat muted tones of red, black, and white for the background and the alternating block.

Of course my Accuqult Qube came in very handy for cutting the quilting pieces.  

As usual I enter my designs in Electric Quilt so that I can get a feel for the look of the pattern, and then I did two test blocks, and then was on my way.

After the first 3 rows, the layout looked like this: 


Needless to say I just feel in love with it!  

After another week, the quilt was completed and will be going to the quilters with the others.

Completed Quilt!

Closeup of quilt layout

The completed quilt is approximately 90 x 90.  The quilt design used, allowed me to use all of the prints in a single quilt without it being overwhelming.

I've got some left over of the 1/4 yd pieces to consider making another quilt from the pieces,

Happy Sewing!


Friday, November 6, 2020

Quilting Part 3 (2020 Survival Sewing).

So I have decided to call these quilts my "2020 Survival Quilts" .  I don't know about everyone else, but everything that has gone on this year is taking its toll on me mentally.

So sewing has become my therapy.  I've been averaging a quilt top every 2 weeks or so.  Ive been doing this since about September timeframe.

I call this part 3 but this is actually my 6th quilt top.  The first 3 were lap quilts.  But for some reason I just don't feel like that size is very usable for me.   I tend to do quilts that are queen/full size. These latest quilts are 80 inches in size or larger.  I like for my quilts to be "used" by the people that received them.  I learned that I am a "UTILITY" quilter; meaning that I like for my quilts to be "utilitized".  (Don't you love the sound of that 😀).

My husband asked me what were we going to do with all of these quilts.  I told him I haven't thought that far yet!  However, I do think I've just about got him convinced that he needs to invest in a Long Arm quilting machine for me.  My husband even mentioned that it could be an investment towards retirement.  Plus with as many quilts I'm making, its cost well over the monthly note for a long arm quilting machine.

Now onto quilt #3: 

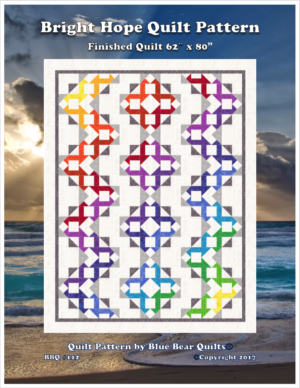
I saw this pattern on a stroll thru instagram, and fell in love with the pattern.  It's called "Bright Hope" from Blue Bear Quilts": 

Image from www.bluebearquilts.com

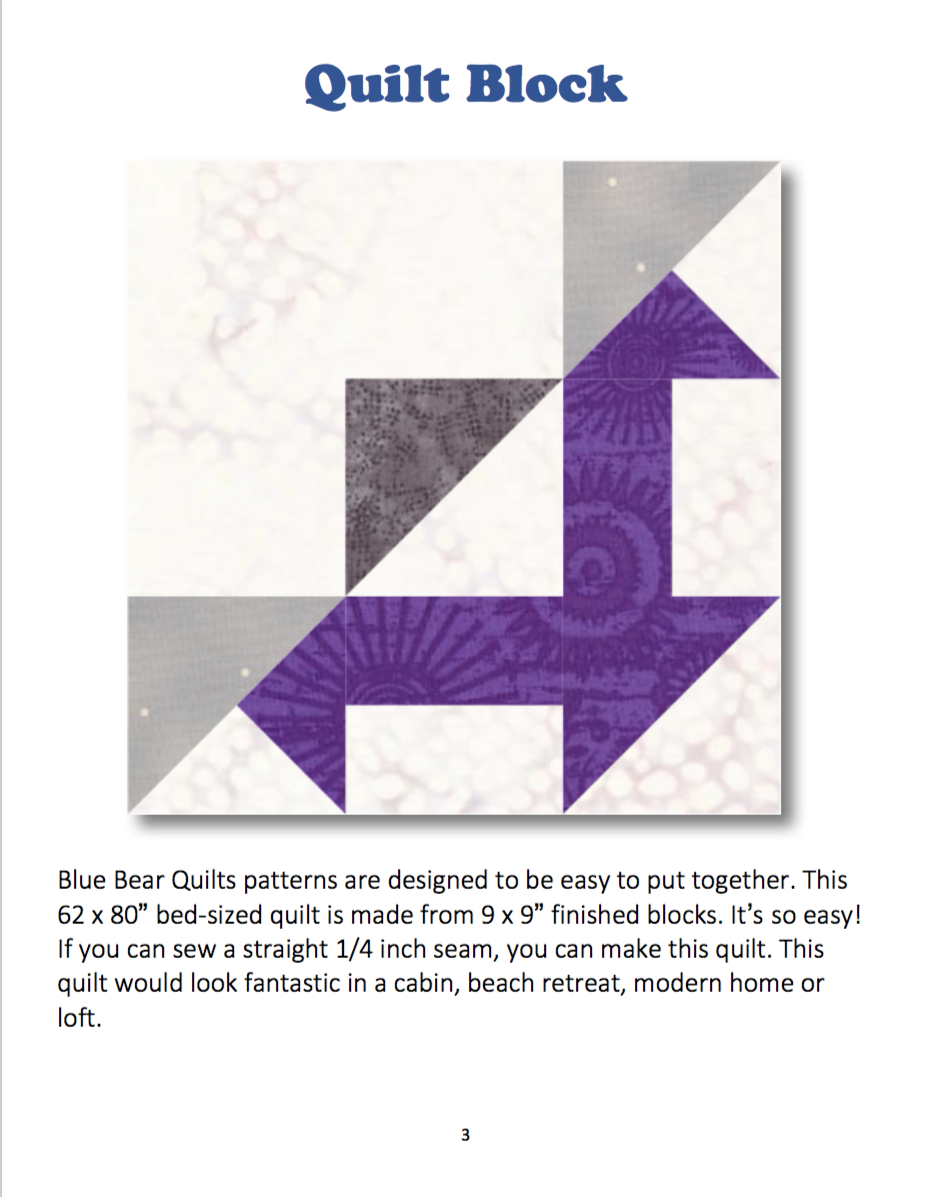
Althought the quilt design looks very involved is based on one block.
Image from www.bluebearquilts.com

I did some "reverse engineering" (The engineer in me creeps out every once in a while). I entered the design into Electic Quilt 8 (Quilt design software). Then I added images of my fabric and was able to get a preview of what the finished quilt would look like. This is my variation of the design from my Electric Quilt software..


During my 2020 survival journey I've had a couple of goals in mind: 

  1. Learn to use my Electric Quilt 8 software
  2. Use my Accuquilt cutter to cut out my design as much as possible (I own all of the qube sets, so I can create just about any block design.
  3. Use as many of my exsting fabric stash as possible.
I used my Accuquilt quilt dies to cut out the block pieces.  This reduced my cutting time tremendously!


If you want something that looks complicated, but is simple to put together definitly visit Blue Bear Patterns and give this pattern a go.  They have some really interesting quilt designs.

This quilt along with the previous one, will be going to the quilter by next week.

Maybe by Christmas I'll get that long arm quilting machine 😉

Happy Sewing Everyone!