Sunday, November 2, 2014

A little something I learned about invisible zippers


Picture from Vogue Fabrics


I was at my sewing group last week and found out about invisible zippers and my invisible zipper foot that I didn't know.

I know that zippers can come in different coil sizes and different lengths.  However I found that the largest coil size I can use with my Bernina is a #3 coil size. 

A fellow seamstress was installing an invisible zipper and was having problems with it.  That's when the shop owner bought up the fact that invisible zipper coils come in varying sizes. So of course I had to do some investigation.  So let me share some of that I've known and learned:
  1. The coil size of a zipper, is the width in "mm" (millimeters) of the coils of the closed zipper.
  2. The zipper size you find in your local sewing shop is a #2 (2 mm) coil size
  3. Invisible zipper coil sizes range in #2 thru #6
  4. The larger coil size is recommended for heavy fabrics, etc and NOT garments.  When sewing in one of these you should use your standard zipper foot and straight stitch plate.
  5. If the zipper coil size is too big, the invisible zipper foot can't get close enough
  6. Lightly pressing the coils, makes it easier to get coil into grooves.  Do this with a low heat so as not to damage the coils, but to make the coils easily accessible.  (I do this with every invisible zipper installation, it makes it so much easier).
  7. Use a grossgrain ribbon as a facing for your zipper, to prevent it from pinching your skin when opening and closing. (Nothing hurts, and I mean HURTS!!! more than this).  I use 1 1/2 inch wide ribbon for this, and make the facing about 1 inch longer than my zipper area. Here is a description of the process from an article at University of Kentucky. 
    From: Zippers by Marjorie M. Baker, University of Kentucky 

    To access the entire article go to Zippers, it's a "everything you ever wanted to know about      zippers!" type of article
  8. I always make my invisible zippers at least 1 inch longer than the opening. It makes the installation a lot easier.
  9. To shorten my zippers I tend to shorten from the bottom if it's an invisible zipper.  Some use a bar tack across near the cut end to secure the zipper end. But because invisible zippers are using a coil, I cut it from the bottom, use a bar tack and then wrap the cut end with some fabric to avoid the cut ends from catching and scratching my garment.  If you have a copy of  "The Sewtionary: An Z to Z Guide to 101 Sewing Techniques and Definitions" (page 244), it has an excellent description of the process. (You can access the entire book for free by clicking the link above.)
Happy Sewing . . . . .      

Saturday, October 4, 2014

Sewing Thrift Shops - A Sewing and Thrifters Dream Come True!!!

A couple of weeks back, I took a Friday off from work and spent the day fabric shopping with a friend.  She turned me on to two Sewing Thrift shops in the Denver area!  I never knew these even existed.

Wooden Spools specialize in Quilting and Knitting supplies.  They buy and sell cotton fabrics for quilting; along with quilting supplies and lots of knitting supplies and yarn.


The store is located at 2805 South Broadway, Englewood CO.  There website is at http://www.woodenspools.com/, and they are also accessible on Facebook

I purchased a couple of pieces of fabric from them and a set of Perfect Patchwork Systems quilting templates.  The fabric was $1.99 a yard, and the quilt templates were only $11 bucks, a considerable savings. This store has lots of fabric, if you are a quilter this place should definitely be on your list.

Then off I went to The Craft Box  (store website). They also have a Facebook page.  It is just located at 16399 South Golden Rd.,  Golden, CO.


 Just recently I found two rolls of gridded tracing paper (Yipee!) for only approximately $10!   Both rolls had over 20 yards of paper on them. I'm still on the first roll. Typically I pay more for the art supply tracing paper that I use.  It is also a great place to find garment patterns, fabric and sewing notions. This store has more notions and crafter items than Wooden Spoons.  Just about anything you need sewing wise can possibly be found here.

I try to make a stop to each of these shops once a month.  By the way did I tell you that I LOVE THESE SHOPS!!!!!

Happy Sewing . . . .

Saturday, September 27, 2014

Resizing a Vintage Pattern - Butterick 8083

As part of my goal to sew a vintage pattern a month, this dress was chosen.

  
(This is a image of the pattern I pulled from the web.)

I got this pattern from the owner of the store that I purchased my Bernina from (She knows I LOVE me some vintage patterns!).  I immediately fell in love with the back neck line. The copy I received was for a 34 bust, so I needed to increase it to a 36 bust. I use the process that I learned months ago, from the link in the side margins.

This meant I had to add 1" to both front and back.  I split this to approximately 3/8" and added them in 3 locations.  Below is a picture of the altered front and back bodice pieces: 


I've got instructions for Vintage Pattern Alterations methods linked to my "pinterest" account here:
Vintage Pattern Sewing.  I did the same alteration to the front midriff piece.  

Here is the finished dress.


Sorry for the blurry pictures, my husband is trying to learn to take the photos; He's used to an Smart Phone; but hasn't mastered my Nikon.

Pattern Review:


Pattern Description: Butterick 8083, View A

Pattern Sizing: Size 14/ bust 34, Altered up to a bust 36

Did it look like the photo/drawing on pattern once you were done sewing? Yes

Were the instructions easy to follow?
Yes at least for me, I am used to sewing vintage patterns.  So someone that is not familiar with the instructions in a vintage pattern might have some difficulty.

What did you particularly like or dislike about the pattern?
I love the look and feel of this pattern; specifically the scoop neckline in the back and the full skirt.

Fabric Used:  A cotton border print that I found at MetroTextiles in New York

Pattern alterations or any design changes you made: 

 -- upsized pattern to a 36" bust
 -- changed skirt bottom to a gathered skirt, because I wanted to make use of the border print
    The fullness of the skirt was based on the width of the lower part of the original skirt pattern
-- I underlined the entire dress, since my fabric was light weight.
-- Added grossgrain ribbon under the zipper (I've pinched myself one time to many zipping fitted bodices!).

Would you sew it again?

Yes, now that I have this sized correctly I will be making a version with short sleeves and the straight skirt out of a light weight wool.

Happy Sewing . . .

Thursday, September 25, 2014

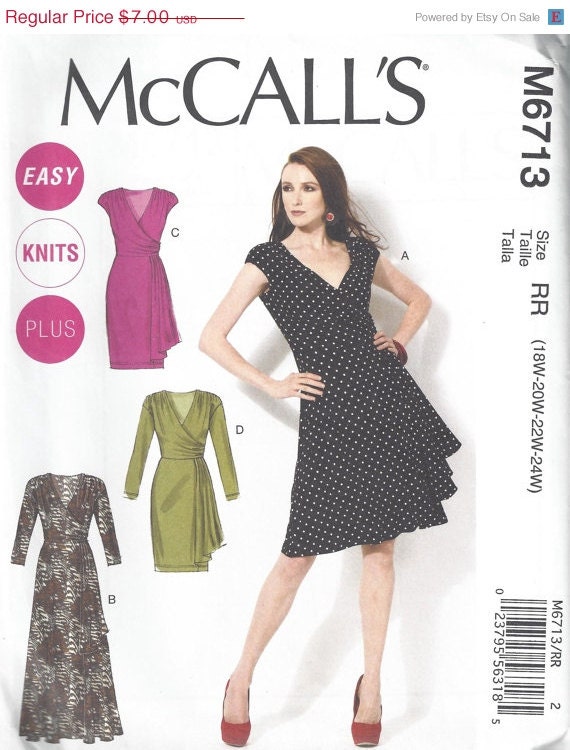
McCall 6713, the Re-do

As I said in my previous post, I fell in love with McCall 6713:
McCall 6713 - Mock Wrap Dress

This time I made it from a fabric from my stash (Sorry I can't recall where I got it from).  But this time I had plenty of fabric to do both sides of the mock wrap.


I think I may have to do this one more time with the full skirt.

Happy Sewing . . .

Tuesday, September 23, 2014

Vintage Pattern Revisited . . . (Simplicity 5185)

Back in January I modified a vintage Simplicity turtleneck top into a knee length dress.

At that time I mentioned that I was going to use some cable knit that I had purchased from Mood fabrics into a maxi dress.

Well I finally got around to doing it (just never got around to posting it).  I wore it to church on Sunday because it was a little cool.  So this was comfortable and warm.  To see the original review go to: Vintage Simplicity 5185


Sunday, September 21, 2014

McCall 6713, The Mock Wrap

I've been sewing, just haven't been sewing.  Over the next couple of weeks, I'll be catching up on my posting.

So here is McCall 6713:


I chose to make view D with the sleeves, shortened to 3/4 length.


I also chose to underline the dress with some knit tricot that I bought months ago by the bolt from Fabric.com when it was 50% off.  So of course I bought an two bolts one in black and in ivory.

Last year my husband and I went to LA, and of course I made a stop at Michael Levin's  by the Pound store, and found this amazing fabric to make the dress from:
Since this was from the bargain bin, I had to work with what I had, so there wasn't quite enough for
me to to two layers to the mock-wrap piece, so I used some of the black tricot for the backside of the mock-wrap.


So here is the final dress: 


Pattern Review:


Pattern Description:  McCall 6713, View D

Pattern Sizing: Size 14/ bust 36

Did it look like the photo/drawing on pattern once you were done sewing: Yes

Were the instructions easy to follow? Yes

What did you particularly like or dislike about the pattern? 
  I love this pattern, and the fit is awesome.

Fabric Used:  tricot for underlining from Fabric.com, spandex knit from Michael Levine's Loft

Pattern alterations or any design changes you made: 
  -- One thing I did do was add some tricot fusible interfacing around the neckline, to keep if from 
       stretching when the underlining was sewn around the neckline and front opening.


  -- Also added width in the hip area to accommodate my hips/rear.

  -- Added 6 inches to length.
  
  -- Did back layer of mock wrap piece in black tricot (ran out of fabric).

Would you sew it again?   YES!, I've already done so, and will be posting it to blog.


Happy Sewing . . . .

Saturday, August 16, 2014

A Style-Arc Pattern for Free - Ann's T-Top

Hi all,

Don't know what you have planned for a Saturday; but I plan to sew for a bit, go to the local Wa-Shonaji quilt show at the Blair Caldwell Library in Denver, and then prepare for the classes that I am teaching this fall.

As I was organizing my sewing strategy yesterday, I am across a free pattern offer from Style-Arc and Gorgeous fabrics.  It's the Ann's T-Top:


I've been wanting to try one of the patterns since I've heard several online sewing buddies give Style-Arc patterns good reviews.  The pattern only takes 1 yard of fabric.  The 
price is that I signup for the emails.

I'm not sure how long it will be available, but I've already. I requested a 10; but they also send you additional patterns for 1 size above and below the one you requested!

Well off I go to sew.

Happy Sewing . . . .